
The finishing moves of the Inuit Net sequence are two very unusual weaves which I call “fixing the bottom” and “cleaning the top.” In the Inuit Net sequence, these weaves are applied to a partially woven figure of considerable complexity.

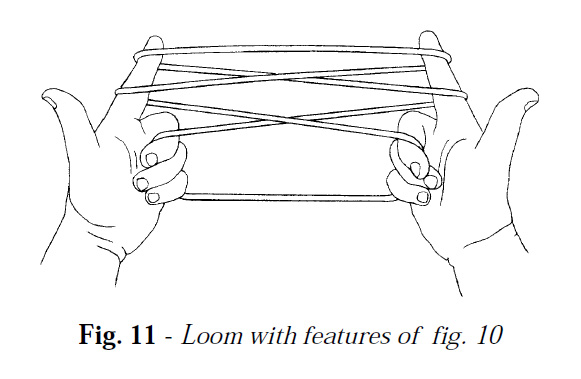
Note carefully the positions of the two transverse strings in the figure above. These are the upper near index string (top transverse) and the far little finger string (bottom transverse). In many string figures transverse strings become the frame strings of the final design, and for this reason their relative positions during the weaving sequence are important.
In the “fixing the bottom” weave, the “bottom” transverse string is drawn through the upper index loop. In the “cleaning the top” weave the top transverse is drawn through the lower index loop (after both are transferred to the thumb!).
What would happen if these two weaves were applied to a greatly simplified version of this figure?
A valid string figure should result if three features are present:
• a transverse upper near index string;
• a transverse far little finger string; and
• a lower index loop.
The simplest string configuration with these features is shown below.
To form this simple loom, proceed as follows:
• Begin with Opening A.
• Transfer each thumb loop to the top of the index, inserting the index finger from below.
• Pass the thumb under the index loops, transfer the little finger loop to the thumb, then immediately re-transfer this loop to the middle-ring-little fingers, inserting them from above and pressing their tips to the palm.
Now “fix the bottom” and “clean the top”. The result is shown below.
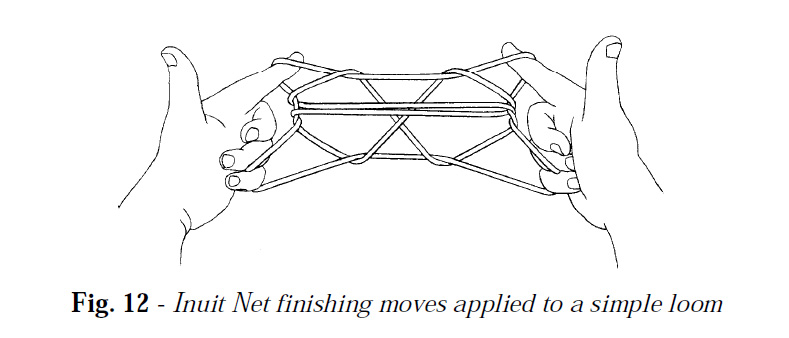
This simple design closely resembles the Navajo figure ‘Carrying Wood’ . Readers should note that the process of abstracting a set of weaves and applying them to a simpler (or more complex) string arrangement with similar features is a powerful design strategy, as demonstrated throughout this book.
Inspired by my success with iterating the first Inuit weave, I immediately wondered whether it would be possible to iterate fixing the bottom and cleaning the top. Since there are two far index strings in the loom figure above, it should be possible to fix the bottom twice (in the traditional method we skip the lower far index string, passing the thumb up behind it instead).
But cleaning the top can only be done once since two loops are required for each iteration. The solution was to create a loom with more than two loops on each index. To create the extra loops, I adapted the loop-adding procedure i devised for building DNA looms. I call this loom the Vertical Loom since any number of loops can be stacked on the index fingers prior to weaving.
Although nearly square when finished, most vertical nets require a loop made from a rather long string since the loom often has three or more index loops. I use “spans” to measure string length, a span being the distance between your fingertips when your arms are fully extended in opposite directions.
String made from 100% nylon is too slippery for making Vertical Nets and should be avoided (the side knots will slip, preventing a sharp extension). A thin smooth cotton string is much preferred (postal twine, for example).
Here’s how to make a simple Vertical Net:
Forming the Vertical Loom (V-Loom)
• Begin with a 3-loop L-DNA loom.
• Transfer the thumb loop to the top of the index, inserting the index finger from below.
• Create another index loop as follows: Insert the left thumb, from above, into the upper index finger loop and return with the upper near index string (rotate the left thumb toward you and up); insert the right thumb, from below, into the left thumb loop and extend.
• Now transfer the thumb loop to the top of the index, inserting the index from below. Using this procedure, create as many index loops as you like. In this example the procedure is done only once.
• Pass the thumb under the index loops, transfer the little finger loop to the thumb, then immediately retransfer this loop to the middle-ring-little fingers, inserting them from above and pressing their tips to the palm. This completes the vertical loom. Since there are three loops on each index in this example, V3-Loom is an appropriate abbreviation (shown below).
Now “fix the bottom” in an iterative fashion. I have renamed this the First Vertical Weave.
First Vertical Weave (V-1)
• Pass each thumb under all the index loops and away from you through the middle-ring-little finger loop.
• With each thumb hook down the lowest far index string and draw it down through the middle-ring-little finger loop until the thumb is below the far little finger string,
• then with each thumb pick up the far little finger string and draw it through the loop on each thumb, which slips off as you return.
• Drop the middle-ring-little finger loop and extend.
• Transfer the thumb loop to the middle-ring-little fingers by inserting the three lesser fingers from below, closing the near thumb string to the palm, and withdrawing the thumb.
Repeat the V-1 sequence until all the far index strings have been consumed. In this example, V-1 is done a total of three times.
The first iteration might feel particularly awkward, but don’t fret: subsequent iterations are much easier. Now “clean the top” in an iterative fashion. i have renamed this the Second Vertical Weave:
Second Vertical Weave (V-2)
Transfer all index loops to the thumb, maintaining their relative order. In this example you have an upper, a middle, and a lower thumb loop. But if you created extra loops when building your loom, these names will not make sense. For this reason we will call the top thumb loop the upper loop and the loop below it the “upper-minus-one” loop.
Insert each index, from above, into the upper and upper-minus-one thumb loops, pick up the upper-minus-one near thumb string, and draw it through the upper thumb loop; then curl the tip of each index around the upper near thumb string, drawing this string away from you and up through the index loop, which slips off.
Drop the upper and upper-minus-one thumb loops and extend.
Transfer the index loop to the top of the thumb, inserting the thumb from below.
Repeat the V-2 sequence until only one thumb loop remains. In this example, V-2 is done a total of two times.
The resulting net, although pleasing, lacks symmetry. In this example three loops encircle the bottom transverse string, but only two encircle the upper transverse string. To “repair” the figure I devised a finishing move that supplies the missing loop:
Vertical Net Finishing Move (V-finish)
To free the thumb, re-transfer the thumb loop to the index, inserting the index from below.
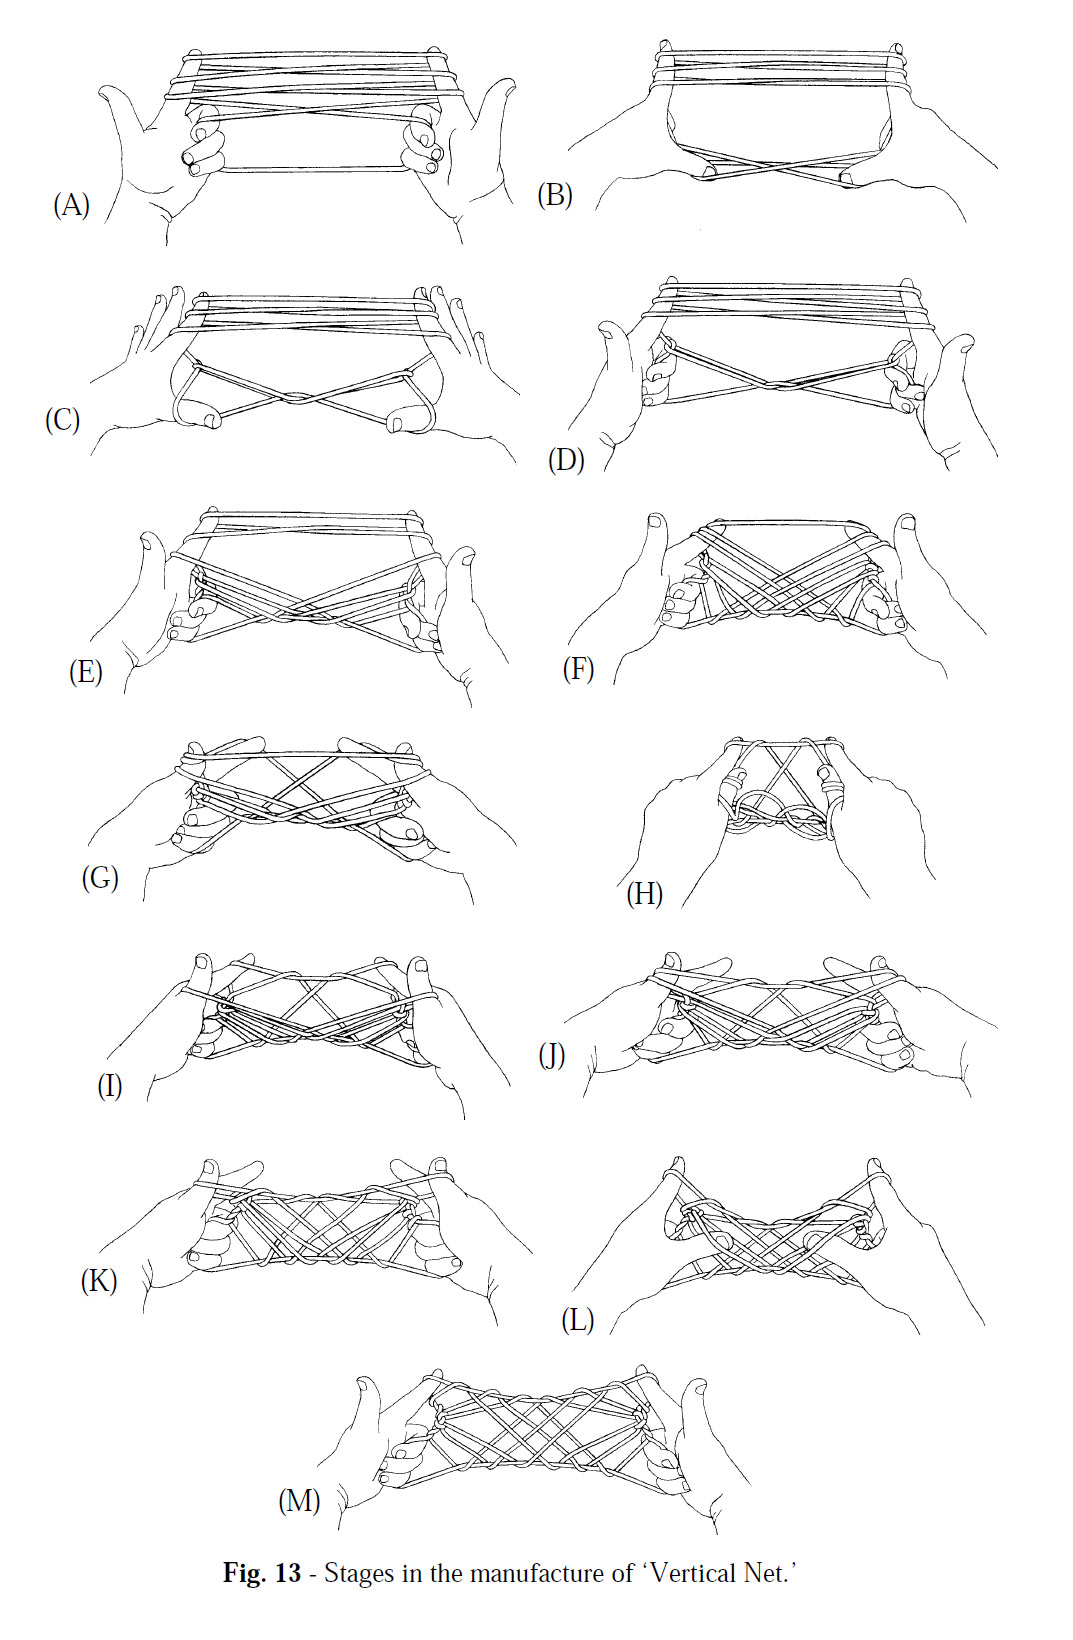
On each hand examine the diagonal strings that run from the palmar “knot” to the far little finger string. Only one of these runs to the center of the far little finger string. With each thumb pick up the diagonal string that runs to the center (fig. 13L) and return with it.
Transfer the index loop to the top of the thumb, inserting the thumb from below.
Insert each index, from above, into the upper and lower thumb loops, pick up the lower near thumb string, and draw it through the upper thumb loop; then curl the tip of each index around the upper near thumb string, drawing this string away from you and up through the index loop, which slips off.Drop both thumb loops and extend.
If desired, apply the Power Lift or Caroline Extension. The formula for this figure is:
Vn-Loom, [V-1]n, [V-2]n-1, V-finish, (Power Lift or Caroline Extension).
where n = the number of index loops in the initial Vertical Loom and superscripts indicate how many times the bracketed sequence is repeated before advancing to the next weave. The result of n = 4 is shown below.
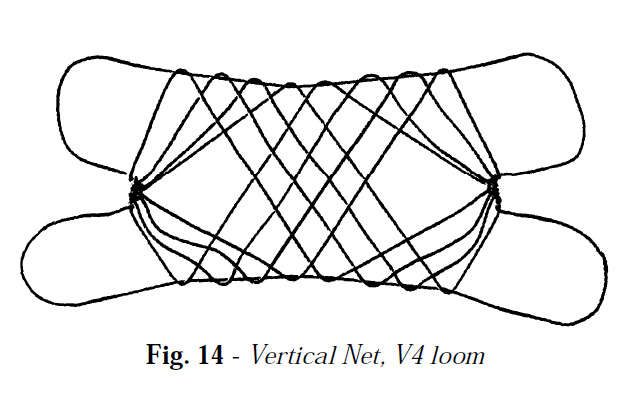
This figure resembles the Nauruan mat seen on the cover of Caroline Furness Jayne’s book in the 1962 reprint by Dover Publications. Note, however, that some “looseness” in the web is unavoidable since the side knots prevent full absorption of the internal slack during the extension.

vertical net 1

vertical net 2
extended discussion of the vertical net figure
another discussion