CHIRALITY
We most often think of our environment as being three-dimensional, but actually
we live in a four-dimensional universe: chirality or “handedness” is a
constant companion. Our two hands can be matched as mirror images by
placing their palms together, but they exhibit asymmetry when placed one on
top of the other since the thumbs lie on opposite sides of the “pancake”.
We often think of Opening A string figures as being symmetrical, and in
most cases the right half of a finished figure is indeed a reflection of the left
half. But the opening itself is chiral (i.e., the left palmar string is taken up
first, followed by the right palmar string). Granted, in most cases we get the
same final design when Opening A is replaced with Opening B (right palmar
string taken up first) or a three-loop DNA opening.
But in some cases we do not. The following exercises explore this concept. I
begin with a summary of common three loop looms and how they differ. This
is followed by instructions for making a canonical figure or “test pattern” for
exploring chirality issues. Loop rotations are also reviewed in a later lesson.
to get you started
an introductory discussion of simple 2 and 3 loop openings
3 loop looms
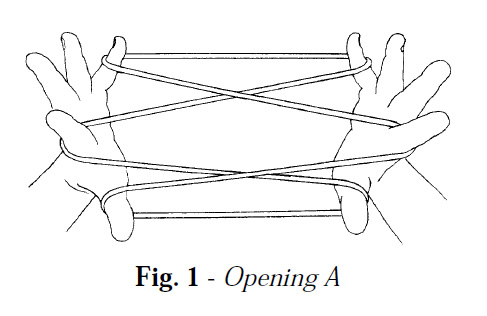
Opening A
The formation of Opening A has been amply described throughout the string figure literature. My procedural analysis would be as follows:
• Place both thumbs into the loop of string from below.
• Introduce the little fingers into the loop from below (this results in the formation of a palmar string). In the literature this stage in the formation of Opening A is called Position 1.
• The right hand reaches to the left palm and the right index picks
up the left palmar string and returns to position.
• The left hand then reaches to the right palm, passes through the right index loop from above, picks up the right palmar string, and returns. The result is shown in fig. 1.
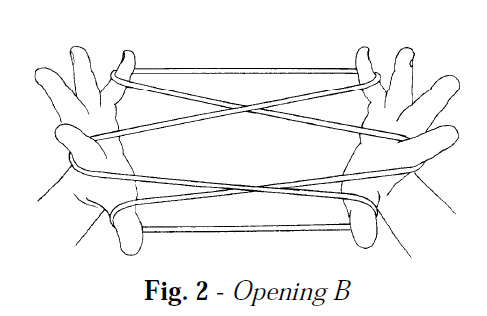
Opening B
Opening B is formed in the same way except the left hand acts first, followed
by the right hand. The result is shown in fig. 2.
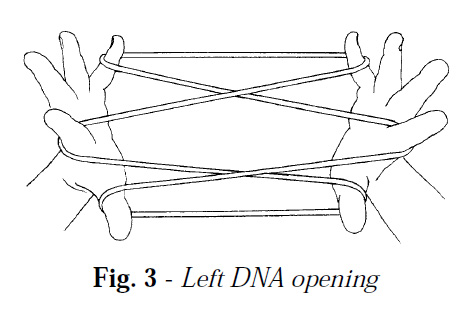
Left DNA (ldna)
The only difference between Opening A and a 3-loop DNA loom is the parity of one or more string crossings. Also different is the way the loom is built: rather than starting with Position 1, a DNA loom starts with a single loop on each little finger. I call it a DNA loom because of the way the strings form a spiral or double helix as loops are added to the hands.
A Left DNA loom is formed by adding loops with the left thumb:
• Begin by placing the loop on each little finger so that the near and far strings are parallel and do not cross.
• Create a second loop as follows: Insert the left thumb, from above, into the little finger loop and return with the near little finger string (rotate the left thumb toward you and up); insert the right thumb, from below, into the left thumb loop and extend.
• On each hand transfer the thumb loop to the index finger.
• Now create a third loop: Insert the left thumb, from above, into the index loop and return with the near index string (rotate the left thumb toward you and up); insert the right thumb, from below, into the left thumb loop and extend (fig. 3). To confirm that the loom is correctly formed, rotate your left hand 90° so that the fingers of your left hand point away from you. If none of the strings touch the loom was formed correctly.
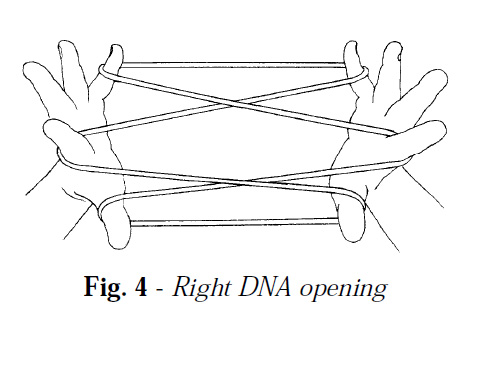
Right DNA (rdna)
A Right DNA loom is formed in the same way, except the right thumb is used to create the second and third loops. The result is shown in fig. 4.
To confirm that the loom is correctly formed, rotate your right hand 90° so that the fingers of your right hand point away from you. If none of the strings touch the loom was formed correctly.
Another way to confirm that the looms are correctly formed is to drop the
index loops. Openings A and B will dissolve, but the two DNA openings will
produce a wrap (a pair of interlocking strings) near the center of the figure.


